
12
Configure Centralized SSH for Linux systems using ShellHub
In this guide, we will learn how to configure centralized SSH for Linux systems using ShellHub. ShellHub is a modernized SSH server that can be used to access
SSH is an acronym for Secure Socket Shell or secure shell. This is a cryptographic protocol used to manage and create a secure communication between two computers over an unsecured network. SSH can also be used to refer to the suite of utilities that implement the SSH protocol. There are several authentication mechanisms, the most common one is password authentication, but there are also public-key-based authentication and encrypted data communications.
SSH can be used to perform the following functions:
- Establish secure remote access to SSH-enabled network systems or devices for users, as well as automated processes.
- automate and secure file transfers.
- Secure management of network infrastructure components.
- Create secure and interactive file transfer sessions.
- secure issuance of commands on remote devices or systems
There are several tools in the market that implement the SSH protocol. These tools include SmarTTY, ZOC, Xshell, FileZilla, Chrome SSH extension, Bitvise SSH Client, WinSCP, MobaXterm, KiTTY, mRemoteNG e.t.c.
In this guide, we will learn how to configure centralized SSH for Linux systems using ShellHub. ShellHub is a modernized SSH server that can be used to access Linux devices remotely either via a command line (using an SSH client) or a web-based user interface.
Normally when you want to access a remote system on your local network via SSH, you need to know the IP address of the system. But if you want to access a system that is outside the network, there are several configurations you need to make such as obtaining the public IP address and configuring your router as required. It even becomes harder to change the VPN/firewall configuration if the device is behind a corporate firewall that restricts SSH connections. ShellHub eliminates this badger by making it easy to access any Linux system behind a NAT or firewall.
The satisfying features associated with ShellHub are:
- SCP/SFTP support: It allows users to copy files to and from devices using industry-standard tools without 3rd party applications
- Firewall rules: It provides a flexible firewall for filtering SSH connections and also gives fine-grained control over which SSH connections reach the devices
- Session recording: All interactive SSH sessions are recorded and can be replayed via a built-in session player in the ShellHub Web UI. This includes all of the user activity that occurs during the session.
- Audit logging: Every time an SSH connection is made to ShellHub a session is created and stored on the server for audit purposes.
- Native SSH support: Access any device behind the ShellHub centralized SSH server using standard tools such as OpenSSH Client, PuTTY e.t.c
- Public-key authentication: This makes it easy to allow multiple users to log in as the same system user without having to share a single password between them. You can revoke a single user’s access without revoking access by other users and make it easier for a single user to log in to many accounts without needing to manage many different passwords.
Getting Started
To eliminate all the dependency issues during the installation, it is recommended to perform ShellHub installation in docker containers using a Docker Compose file.
So for this guide to work best, you need the following:
- Ensure Docker Engine and Docker Compose are installed on your system.
- Port 22 and 80 available and open on the firewall
The Docker Engine can be installed on any Linux system using the guide below:
- How To Install Docker CE on Linux Systems
Once installed, ensure the service is started.
sudo systemctl start docker && sudo systemctl enable docker
Also, add your system user to the docker group.
sudo usermod -aG docker $USER
newgrp docker
Now install docker Compose using the guide below:
Also ensure that you have the required packages installed:
##On CentOS/RHEL/Rocky Linux/Alma Linux
sudo yum install make -y
##On Debian/Ubuntu
sudo apt install make -y
Allow ports 80 and 22 through the firewall:
##For Firewalld
sudo firewall-cmd --add-port={22/tcp,80/tcp} --permanent
sudo firewall-cmd --reload
##For UFW
sudo ufw allow 22
sudo ufw allow 80
Stop any services using ports 22 and 80. If the ports have other important services running, you can choose to use other ports by making changes to the .env file as shown in the below step.
Step 1 – Download ShellHub on Linux
We will begin by cloning the latest stable version from GitHub:
sudo apt install build-essential
git clone https://github.com/shellhub-io/shellhub.git
Now navigate into the directory:
cd shellhub
echo "SHELLHUB_ENV=development" >> .env.override
Once in the directory, create the required keys with the command:
$ make keygen
Generating RSA private key, 2048 bit long modulus (2 primes)
................+++++
.................................................+++++
e is 65537 (0x010001)
writing RSA key
Generating RSA private key, 2048 bit long modulus (2 primes)
...........+++++
.................................................+++++
e is 65537 (0x010001)
Step 2 – Install ShellHub on Linux
For this deployment, there are several docker-compose files for various environments. However, we are advised to avoid using docker-compose directly unless you are sure of what you are doing.
The easiest way to start the deployment with defaults is by executing the command:
make start
Sample output:
.......
[+] Running 8/8
 ⠿ Network shellhub_network      Created                                   0.2s
 ⠿ Container shellhub-ssh-1      Started                                   3.6s
 ⠿ Container shellhub-mongo-1    Started                                   3.8s
 ⠿ Container shellhub-redis-1    Started                                   3.8s
 ⠿ Container shellhub-api-1      Started                                   3.6s
 ⠿ Container shellhub-ui-1       Started                                   4.6s
 ⠿ Container shellhub-cli-1      Started                                   4.4s
 ⠿ Container shellhub-gateway-1  Started                                   4.9s
Once complete, verify if the containers are running:
$ docker ps
CONTAINER ID   IMAGE                        COMMAND                  CREATED          STATUS                    PORTS                                       NAMES
c210563acd7a   shellhubio/gateway:v0.10.3   "/entrypoint.sh /usr…"   43 seconds ago   Up 37 seconds             0.0.0.0:80->80/tcp, :::80->80/tcp           shellhub-gateway-1
f74a69259458   shellhubio/ui:v0.10.3        "/docker-entrypoint.…"   44 seconds ago   Up 38 seconds             80/tcp                                      shellhub-ui-1
71b867c8032a   shellhubio/cli:v0.10.3       "/bin/sleep infinity"    44 seconds ago   Up 38 seconds                                                         shellhub-cli-1
495206e835e0   shellhubio/api:v0.10.3       "/bin/sh -c '/api se…"   44 seconds ago   Up 39 seconds                                                         shellhub-api-1
65c5aabb9362   shellhubio/ssh:v0.10.3       "/bin/sh -c /ssh"        45 seconds ago   Up 40 seconds             0.0.0.0:2222->2222/tcp, :::2222->2222/tcp   shellhub-ssh-1
7de36a089ea7   mongo:4.4.8                  "docker-entrypoint.s…"   45 seconds ago   Up 40 seconds (healthy)   27017/tcp                                   shellhub-mongo-1
e3b3e85e9add   redis                        "docker-entrypoint.s…"   45 s
You can also make deployments suitable for your environment.
Production Deployment
For production deployment, there are some configurations you need to make. These are:
- Enable HTTPS
- Set persistent volume for MongoDB
a. Enable HTTPS
By default, ShellHub provides automatic HTTPs support using Let’s Encrypt. To enable this, you need to make these adjustments in the variables file:
vim .env
In the file, provide:
- SHELLHUB_HTTP_PORT, the default port is 80
- SHELLHUB_HTTPS_PORT, the default port is 443
- SHELLHUB_SSH_PORT, the default port is 22 but you can set it to any other port such as 2222
- SHELLHUB_PROXY, default set to false. This can be set to true if you are running a Layer 4 load balancer with proxy protocol in front of ShellHub.
- SHELLHUB_AUTO_SSL, set to false by default but can be enabled to use automatic HTTPS with Let’s Encrypt
- SHELLHUB_REDIRECT_TO_HTTPS, set to false, but you can enable to redirect requests from the HTTP port to the HTTPS port.
- SHELLHUB_DOMAIN, the default value is localhost, here you can provide the domain of the server.
However, it is also possible to configure HTTPs manually. This is commonly done by configurong NGINX reverse proxy with your desired certificates. For this case, you need to modify your docker-compose.yml and add the line below.
version: '3.7'

services:
  gateway:
      ports:
       - "127.0.0.1:${SHELLHUB_HTTP_PORT}:80"
When configuring Nginx for reverse proxy, remember to add the blocks below:
location / {
     proxy_pass http://127.0.0.1:<SHELLHUB_HTTP_PORT>;
     proxy_http_version 1.1;
     proxy_set_header Upgrade $http_upgrade;
     proxy_set_header Connection "upgrade";
     proxy_read_timeout 86400;
     proxy_set_header Host $host;
}

location /ws/ {
     proxy_pass http://127.0.0.1:<SHELLHUB_HTTP_PORT>;
     proxy_http_version 1.1;
     proxy_set_header Upgrade $http_upgrade;
     proxy_set_header Connection "upgrade";
     proxy_read_timeout 86400;
}

location /ssh/ {
     proxy_pass http://127.0.0.1:<SHELLHUB_HTTP_PORT>;
     proxy_http_version 1.1;
     proxy_set_header Upgrade $http_upgrade;
     proxy_set_header Connection "upgrade";
     proxy_read_timeout 86400;
 }
b. Setup MongoDB persistent volume
By default, the storage happesna by writing the files to the Docker’s internal volume. In a prod environment, it is highly recommended that you create a data directory on the host system filesystem and map it to the MongoDB container.
Create the directory:
sudo mkdir -p /data/mongo
sudo chmod 775 /data/mongo
Now modify your docker-compose.yml
  mongo:
    image: mongo:4.4.8
    restart: unless-stopped
    healthcheck:
      test: "test $$(echo \"rs.initiate({ _id: 'rs', members: [ { _id: 0, host: 'mongo:27017' } ] }).ok || rs.status().ok\" | mongo --quiet) -eq 1"
      interval: 30s
      start_period: 10s
    command: ["--replSet", "rs", "--bind_ip_all"]
    networks:
      - shellhub
    volumes:
      - /data/mongo:/data/db
Once the moficatiosn have been made, you can start the containers with the command:
make start
Step 3 – Access the ShellHub Web UI
Depending on the deployment made, you can access the ShellHub Web via HTTP or HTTPS using your IP address or domain name.
$ ./bin/add-user <username> <password> <email>
Remember to replace the values correctly. For example:
$ ./bin/add-user admin StrongPassword [email protected]
User added!
name: admin
username: admin
email: [email protected]
Te user can be deleted with the command:
$ ./bin/del-user <username>
You can also edit/reset the password:
$ ./bin/reset-user-password <username> <password>
Now use the created user creds to login to the Web.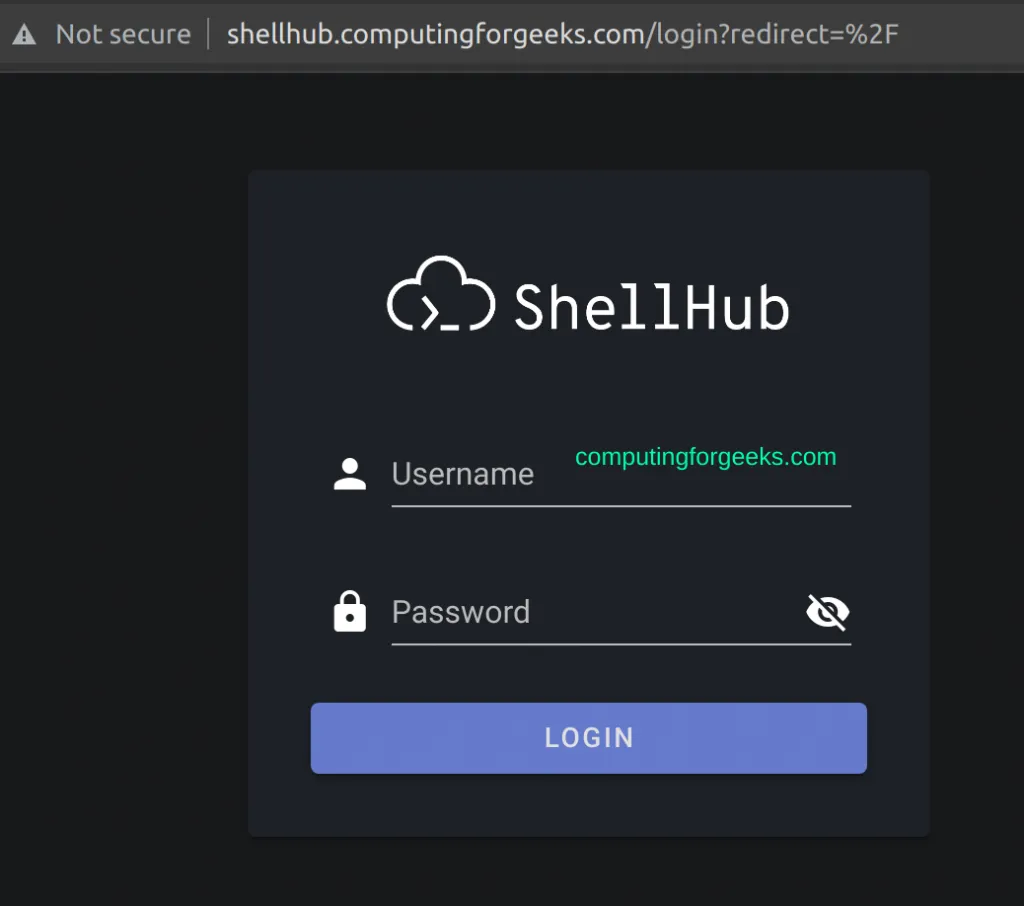
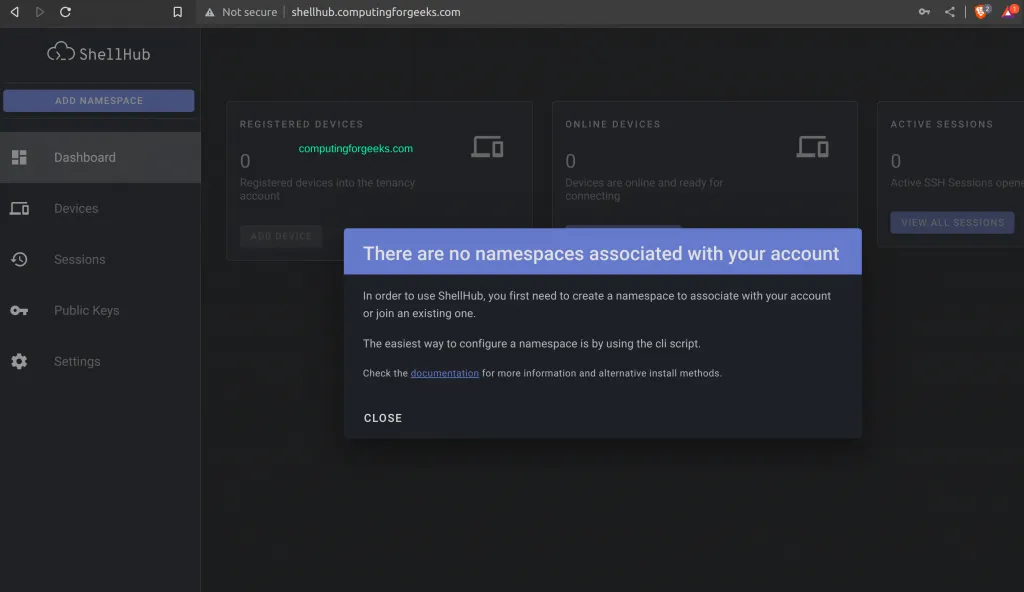
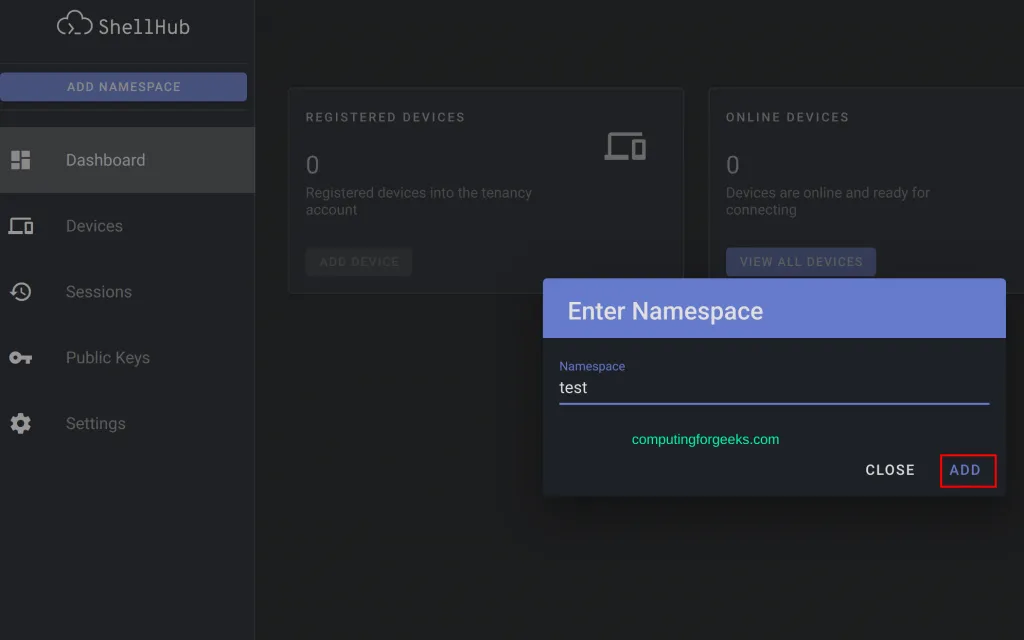
$ ./bin/add-namespace <namespace> <owner>
Replace the values, for example:
$ ./bin/add-namespace test admin
Namespace added: test
Owner: 63736b67de1792158ce86436
Tenant ID: d2961764-ea74-4aff-8683-cefed4f45b83
To delete the namespace, use the command:
./bin/del-namespace <namespace>
To add a user to the namespace:
./bin/add-user-namespace <username> <namespace>
To delete the user from the namespace:
./bin/del-user-namespace <username> <namespace>
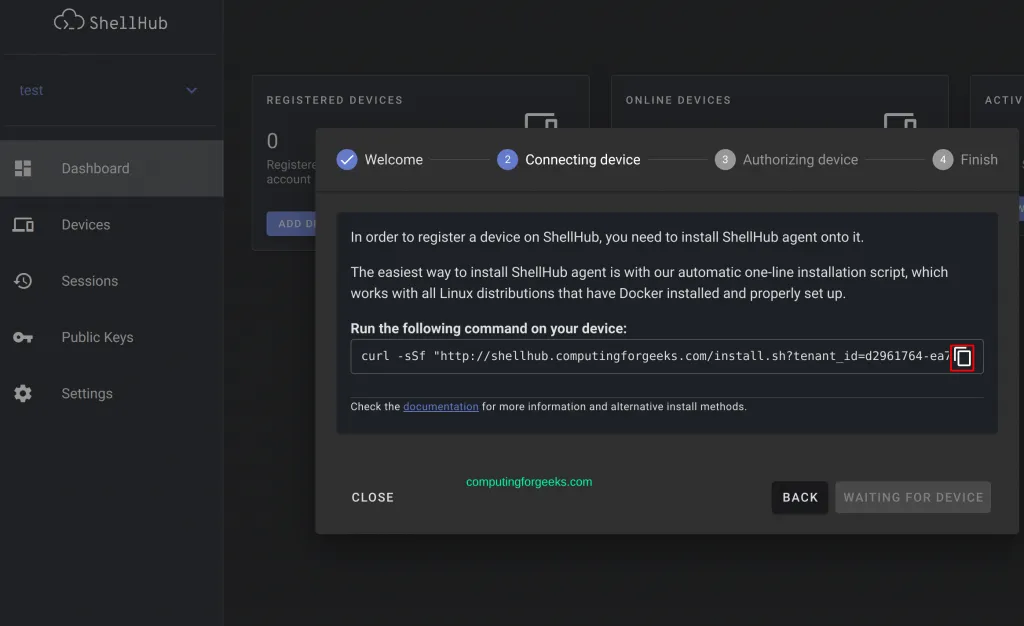
Step 4 – Managing Devices using ShellHub
Once the installation has been made, you can add and connect to various devices in your infrastructure. To add a device, select the namespace and navigate to the devices tab.
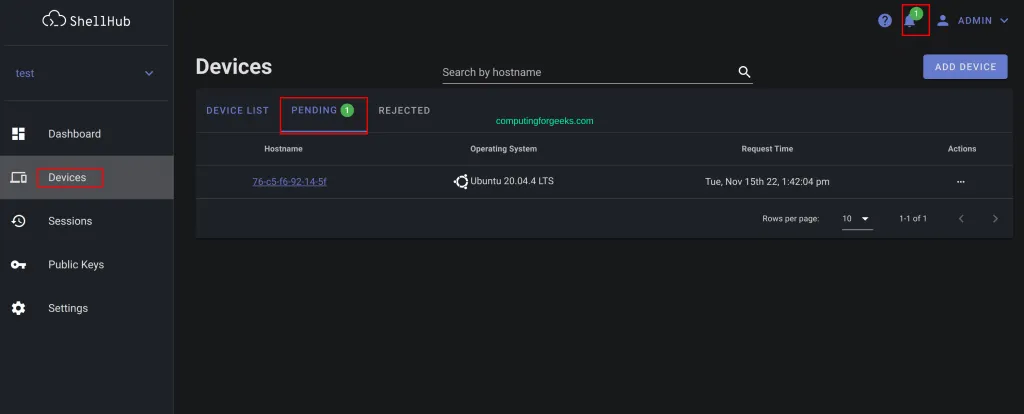

Connecting to Devices
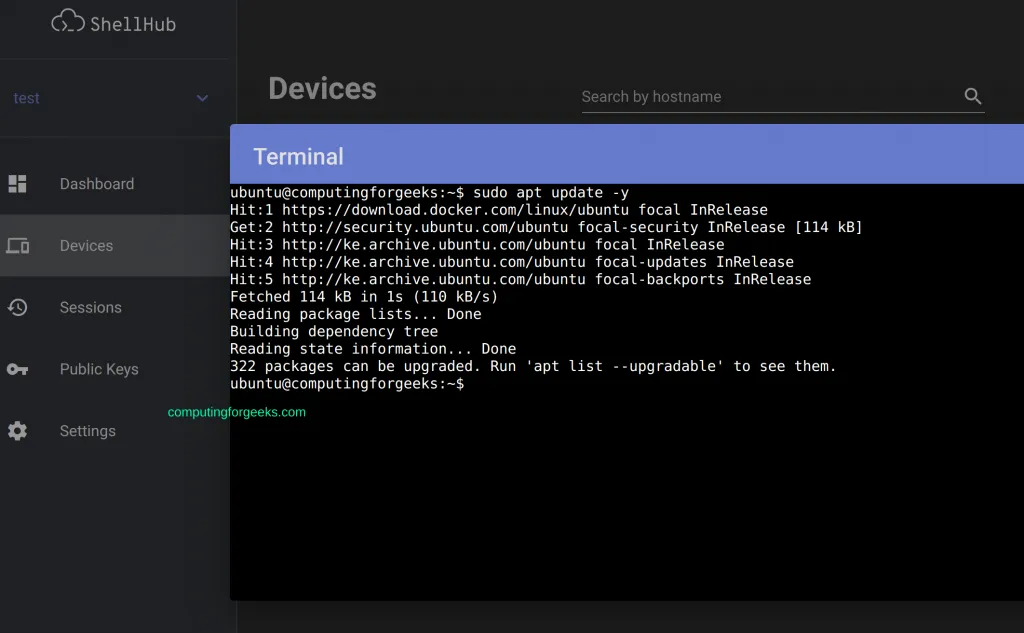
Once the devices have been added to shellHub, you can connect to them using two methods. The first and easiest method is via the web. Navigate to the Devices tab and choose the device to connect to:
Another method is by using the SSH client. The supported SSH client is version 2.0 and above. This can be done using the command below:
ssh <USER>@<SSHID> -<SSH_PORT>
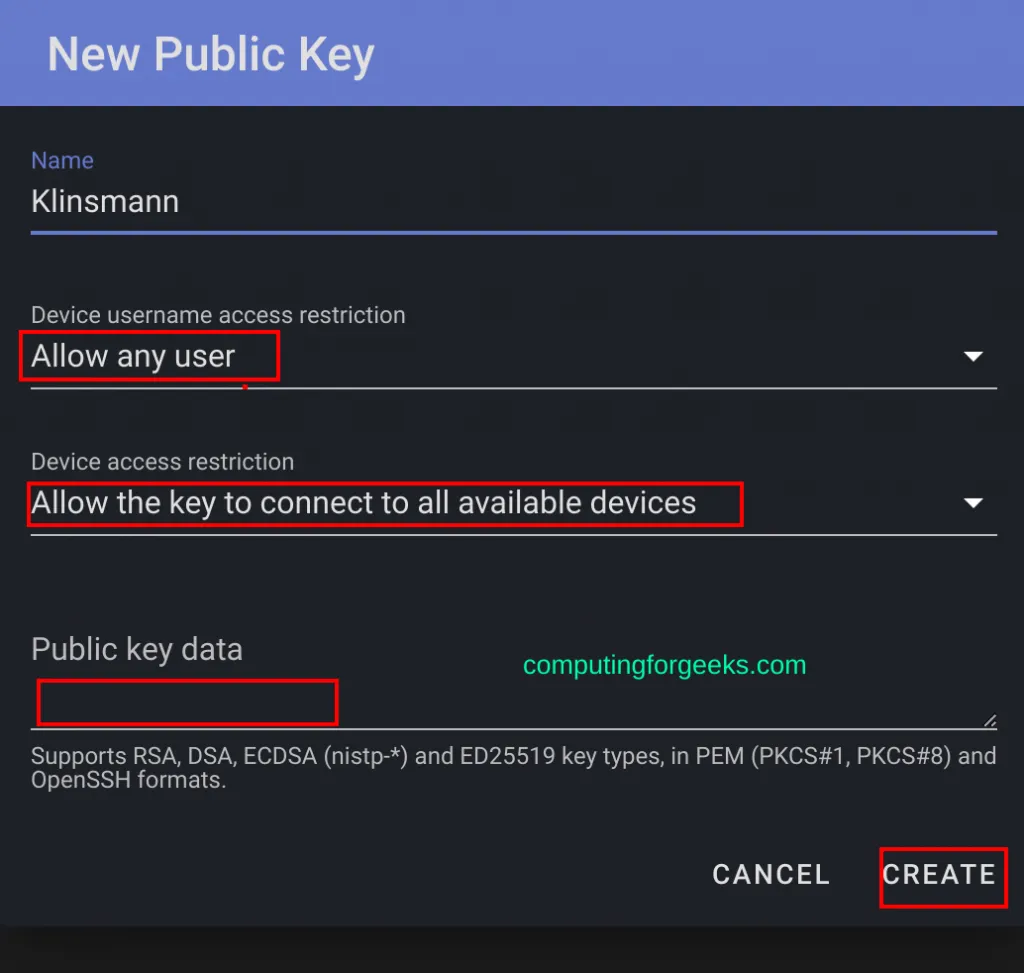
The SSHID is obtained from the web. To make this way niftier, you can to connect to the added devices using public keys(no password required). First, create a public key on the host machine:
$ ssh-keygen -q -N ""
Enter file in which to save the key (/root/.ssh/id_rsa):
View the generated key:
cat ~/.ssh/id_rsa.pub
Now on the ShellHub web, create a Key that can be used to connect to specific/all the machines by navigating to Public Keys -> Add Public Key
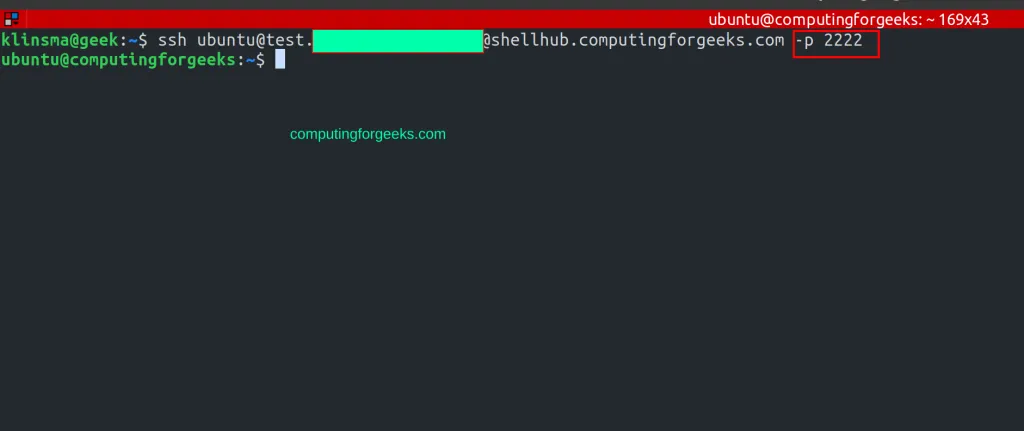
Now using the created key, you can connect to any of the devices form the host system with the command:
ssh <USER>@<SSHID> -<SSH_PORT>
For this case, I will provide the port since ShellHub is running on port 2222
The ShellHub containers automatically start on system boot. They can only fail in cases where you have other services enabled on port 22 and 80.
To upgrade the containers to newer versions, use the below steps.
First, navigate into the ShellHub project directory:
cd shellhub
Stop the instance:
make stop
Fetech the latest changes:
git remote update origin
Checkout the latest versions:
git checkout v0.10.3
Now start the instance:
make start
Verdict
In this guide, we have learned how to configure a centralized SSH for Linux systems using ShellHub. This can be vital when accessing Linux systems behind a NAT or firewall. I hope this was significant to you.
Contact
Missing something?
Feel free to request missing tools or give some feedback using our contact form.
Contact Us